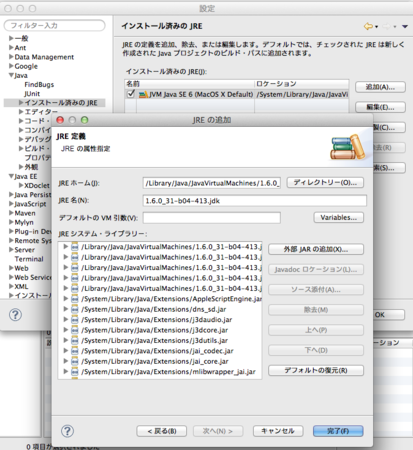
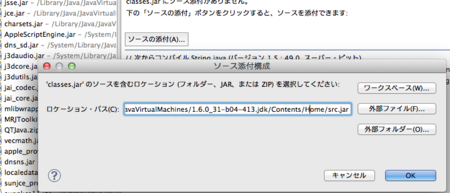
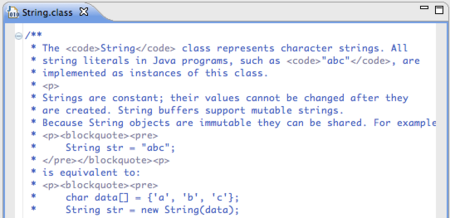
Mac OSXのEclipseにJavaのソース付きのJDKを設定する方法
MacにJDKをインストール新たにインストールしたり、今回みたいにFlashback対策のようなセキュリティアップデートがされた際に、JDKを再インストールするわけですが、いつものソース付きJDKインストール、設定の仕方を忘れるのでまとめました。
2. Apple Developerのダウンロードで最新のJava for Mac OS X 2012-01 Developer Packageをダウンロードする
Scala+sbt+EclipseでUTF-8文字とUIを含む実行jarのアプリケーション作成、開発方法
全国のScalaファンのみなさん、こんにちわ!
最近よくScalaをいじっていることもあって、Scalaを使ってUTF-8の文字を表示しつつ、SwingのUIなんかを表示させる実行jarを作ったりすることがあり、いろいろと開発環境の設定が面倒くさい所もあるのでその手順をまとめておきました。
Scalaを使って日本語を使ったUIを表示させることのできる実行jarをビルドするHelloWorld!と考えてもらえれば良いです。無論、UTF-8文字やUIを含まなくてもこの方法でビルドできます。
まず使っている使っている環境です。
- Mac OSX Lion 10.7.3
- XCode 4.1 (4.3とかの方はcommandline toolsを別途設定でインストールしてあれば問題なし)
- java 1.6.0_31
- Homebrewの4月14日時点の最新
- git 1.7.10
- scala 2.9.1-1
- sbt 0.11.2
- siasia/xsbt-proguard-plugin · GitHubの4月14日時点の最新
- typesafehub/sbteclipse · GitHubの4月14日時点の最新
- Eclipse 3.6.2 herios cocoa 64bit
- Scala IDE for Eclipse 2.0.0
となります。
というわけで、早速はじめていきます。プロジェクト名をhelloswingにしてにしてありますが、その辺は適宜変更して使って下さい。ちなみに、自分のワークスペースは、
$ cd ~/Dropbox/Dev/sbt
というパスから開始してやっていますが、その辺も適宜調整お願いします。
sbtのプロジェクトの作成
 $ mkdir helloswing
 $ cd helloswing
 $ mkdir -p src/main/scala
 $ mkdir -p src/test/scala
 $ echo 'import javax.swing.JOptionPane; object Helloswing { def main(args: Array[String]) = JOptionPane.showMessageDialog(null, "こんにちわ!世界!") }' > src/main/scala/Helloswing.scala
 $ vim build.sbt
ここまでで、Mavenでよく使われているフォルダ構成の作成とMainにてダイアログを表示させる処理を実装しました。最後にbuild.sbtを編集します。別にvimでなくてもお好きなエディタで以下のような内容にします。
name := "helloswing"

version := "1.0"

scalaVersion := "2.9.1"
これで、プロジェクトは完成です。
ビルド後、実行してみましょう。
$ sbt
  > run
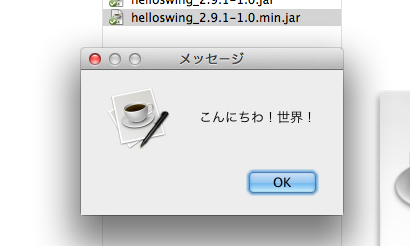
以上のようなメッセージダイアログが出ればプログラムは完成です!
Ctrl+Dでsbtは終了させることができます。
実行jarのビルド
というわけで今度はここから実行jarを作成できるようにします。そのためにprogaurdというsbtのプラグインをインストールしていきます。
siasia/xsbt-proguard-plugin · GitHub
以上の本家を参考にしていますが、sbt 0.11.1とsbt0.11.2でフォルダ構成が違うので要注意です。では進めていきます。
 $ mkdir project
 $ vim project/plugins.sbt
場合によっては、projectフォルダは既にあるかもしれません。次に以下を追記します。
libraryDependencies <+= sbtVersion(v => "com.github.siasia" %% "xsbt-proguard-plugin" % (v+"-0.1.1"))
これがプラグインの依存関係を追加する設定です。
 $ mkdir project/project
 $ vim project/project/Build.scala
次に以下を追記します。
import sbt._
object PluginDef extends Build {
	override def projects = Seq(root)
	lazy val root = Project("plugins", file(".")) dependsOn(proguard)
	lazy val proguard = uri("git://github.com/siasia/xsbt-proguard-plugin.git")
}
これは依存関係がなかったらGitHubからダウンロードしてくるという設定です。
$ vim build.sbt
以上を編集して、以下の用に処理を開始するprogaurdの設定の読み込みと、Mainのobjectの設定を追記します。
name := "helloswing"

version := "1.0"

scalaVersion := "2.9.1"

seq(ProguardPlugin.proguardSettings :_*)

proguardOptions += keepMain("Helloswing")
これでOK。
最後に、scala-liblary.jarをlibフォルダに同梱して、実行jarをビルドしてみましょう。
 $ mkdir lib
 $ cp /usr/local/Cellar/scala/2.9.1-1/libexec/lib/scala-library.jar lib
 $ sbt
   ..
   > update
   ..
   > proguard
   ..
   [success] Total time: 30 s, completed 2012/04/14 17:08:37
実行jarの場所は、以上のスクリーンショットのように
target/
/ .min.jar
という形式になります。minがついていないものはscala-library.jarが含まれていないものです。
というわけで、helloswing_2.9.1-1.0.min.jarをダブルクリックしてみましょう。以下のように表示されれば、実行jarビルドは成功です。

Eclipseへのインポート及びデバッグ実行
さて、これを今度はEclispseで動かしてみたいと思います。そのためにtypesafehub/sbteclipse · GitHubというプラグインを使います。このサイトの手順にしたがって、
$ vim project/plugins.sbt
以上のファイルを編集し、依存関係を追加します。
libraryDependencies <+= sbtVersion(v => "com.github.siasia" %% "xsbt-proguard-plugin" % (v+"-0.1.1"))

addSbtPlugin("com.typesafe.sbteclipse" % "sbteclipse-plugin" % "2.0.0")
最後の一行を追加して最終的にこのようになります。Eclipseに読み込む設定をします。
 $ sbt
   > eclipse
   [info] About to create Eclipse project files for your project(s).
   [info] Successfully created Eclipse project files for project(s): helloswing
これで完了です。とは以下のようにScala IDEをインストールしたEclipseに読み込みます。
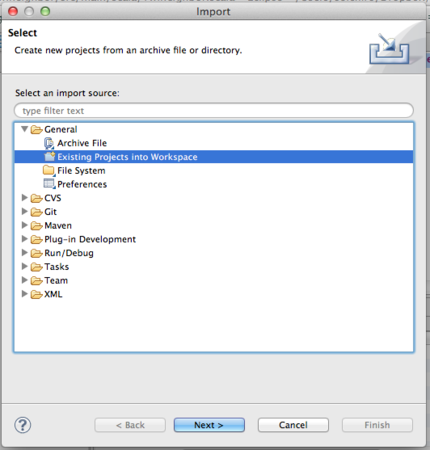
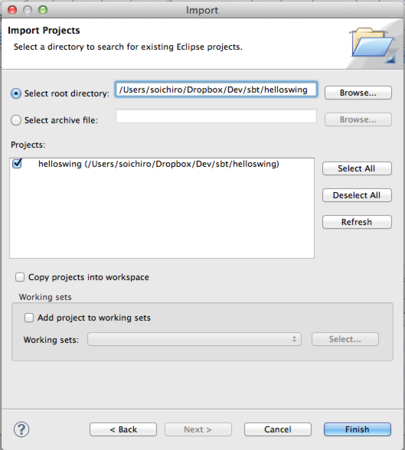
プロジェクトエクスプローラーの右クリック > Import > General > Existing projects into workspaceから、以下のようにコピーをせずにインポートしましょう。(でないと同期してくれなくなります)
じつは、ここからが肝で、エラーが出るのでそれを解消します。まず、プロジェクトエクスプローラーで、helloswingのルートノードを選択して、右クリック > Propertiesから。
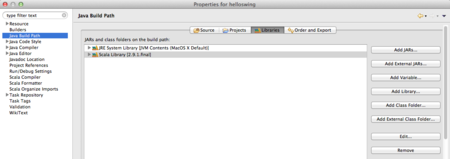
Java Build Pathに重複している、Scala Libraryの取り除きを行います。
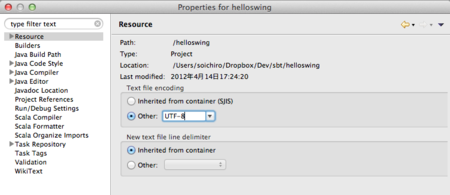
次に、ResourceからText file encodingがSJISになっているので、UTF-8に変更します。
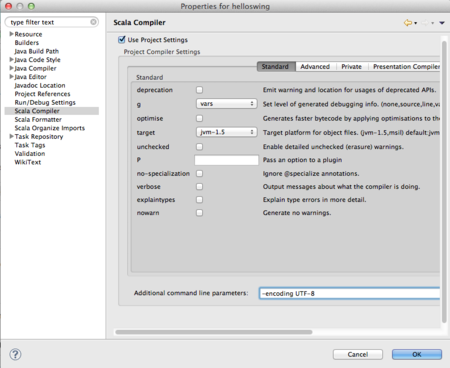
最後に、Scala Compilerで、プロジェクトの設定を使うようにして、追加コマンドライン引数に-encoding UTF-8加えます。
-encoding UTF-8

これでOKです。早速Helloswing.scalaを開いて、右クリック > Debug As .. > Scala Applicationsからデバッグしてみましょう。
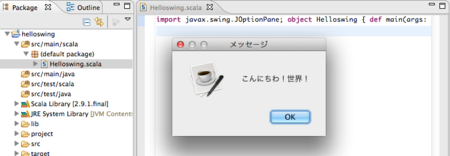
これで無事起動出来ればOKです。無論、ブレークポイントを貼ってデバッグすることもできますので、あとはお好きに。
実行jarの作成は、sbtから行いますので sbt→updatem→proguardという手順でビルドできます。あとはJenckinsにsbtのプラグインを入れてデイリービルドなり、デイリーテストなりをやってみてください。
あと、sbtで依存ライブラリを追加する際には、再度eclipseコマンドを実施してインポートの手順を踏むことでうまくいきます。
以上です。お疲れ様でした。
SSHを介してVimを使う人に感動的なESCキーを押すとESCキーが効きつつIMEがオフになる設定(Google日本語入力とVimの相性は最強!)
Vimをお使いの皆さん、こんにちわ。
Vimを使って日本語のコメントやドキュメントを書かなきゃいけな人をいつも悩ますのが、IMEのモードの問題です。
(IMEオン, IMEオフ) x (挿入モード, コマンドモード, ビジュアルモード) の、この全6パターンを意識しながら操作するのは非常に間違いやすいです。特に日本語を挿入モードで書いたあと、コマンドモードに抜けるとよくIMEがオンになっていて、あうぅ。。とよくなってしまう。
KaoriYaさんのMacVimやGVimを使っている方は幸せです。
set imdisable
という設定をvimrcに書く手があります。これで挿入モードから抜ける際、入る際に必ずIMEがオフになります。
問題は、コンソールやiTermなどからSSHを介してサーバー上のVimを使っている場合です。この設定が効きません。そりゃ普通はサーバー上にIMEはありませんので仕方ありません。なので、この問題がなかなか解消されなかったのです。
中にはこの機能のためにiTerm2の自家製ビルドを作っている方すらいます。
しかし!この由々しき問題を解決してくれたのがGoogle日本語入力です!インストールしてデフォルトのIMEに設定の後、
環境設定... > 一般タブ > キー設定 > キー設定の選択
にて、一度、キーの設定を「ことえり」を選択した後、編集のコンボボックスから新しいエントリーを追加して以下のように、Escapeを押すと「キャンセル後IMEを無効化」というエントリーを全状態に対して6個追加すると、あら不思議!
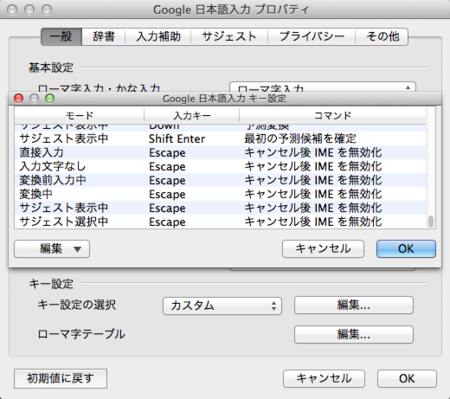
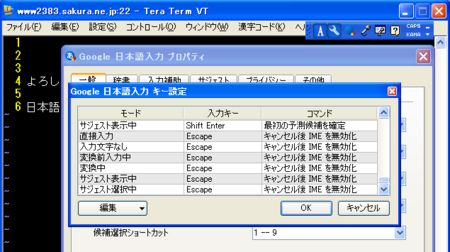
なんと、Escapeで挿入モードを抜けると必ずIMEがオフになります。これは他のキーのリマップのソフトで設定するのと違ってEscapeキー自体の機能が失われません!
MacOSX LionのiTerm2では検証済みです。Macの場合はターミナルからではダメですし、MacVimでは
これで、SSHを介してVimを使っている方はかなり楽に日本語の入力をサーバー上で行うことができるようになるのではないでしょうか。
ぜひ、ことえりやMS-IMEから乗り換えてGoogle日本語入力で快適なVimライフを送ってみてください!
追伸
なお、自分のvimrcは、GitHubにて公開しており、MacOSX, CentOS, FreeBSD, MiracleLinuxにて共有して使っています。日々精進中ですが、もしよかったら見てみてください。
vimを使う上で欠かせないproject.vimのヘルプの日本語訳(意訳)

最近project.vimを使ってプロジェクトツリーを表示してソースを読む事が多いのですが、実際には、:Project {filename}で起動した後、
以上二つしか使ってきませんでした。
ただ他にもいろいろな使い方ができるようで、そのためにヘルプを読んでいたのですが、その際に作った意訳が他の人にも役立つかもしれないので掲載します。質が悪いので野良翻訳なので、原文も一緒です。
ちなみに、この度知った役に立ちそうなコマンドは、
- \Gで、現在のプロジェクト以下を全てgrep
で、プロジェクトウインドウの最大化、最小化 - \sで、水平分割して新たにファイルを表示
- zMで、プロジェクトを全てたたむ
- Ctrl+↑or↓で、ファイル名の並び替え
- プロジェクトファイルに # でコメント行としてTODOなどを記述
- ファイルを追加する時は、プロジェクトファイルに行追加して開くだけでできる
でした。
in.vimやout.vimを使っていろいろカスタマイズもできそうです。ここまでやると本当にIDE並みです。
なお、project.vimの配布元は
project.tar.gz : Organize/Navigate projects of files (like IDE/buffer explorer)
です。ここでダウンロードできる最新版のproject.txtを意訳しました。:help projectで読めます。
かなり適当な訳ですが悪しからず。
project.txtの日本語訳(意訳)
project.txt
		このプラグインは、複数のソースによる複数のプロジェクト
		を管理するためのものです。
		Vimのバージョンは6.xと7.xに対応しています。
		最終更新日時: Fri 13 Oct 2006 10:20:13 AM EDT

原著: Aric Blumer <aricvim at charter.net>
翻訳(意訳): Soichiro Yoshimura <yoshimura at soichiro.org>

	内容:

		コマンド
		継承
		マッピング
		マッピング追加
		設定
		設定例
		TIPS


このプラグインは、よくアクセスするファイルのリストに簡単に
ナビゲーションするための基本的な機能があります。
このリストはVimウインドウの左側に表示されます。
また<Return>かファイル名でダブルクリックするとリストのファイルを
開くことができます。またファイルエクスプローラーを使って簡単に
ディレクトリ階層を探索することができます。

ディレクトリの変更と選択したファイルへのVimスクリプトの実行を
プラグインにさせることができます。例えば、$PATH内のコンパイラを
含むような環境の変更ができます。これは異なる環境を使う複数の
プロジェクトにクイックフィックスなどを簡単に利用する事ができます。

その他の含まれる特徴:
	プロジェクトの全てのファイルの読み込み/除去(\l, \L, \w, and \W)
	プロジェクト内の全てのファイルをgrepする (\g and \G)
	ユーザスクリプトのファイルへの実行(ファイル上の外部プログラムも可) (\1 through \9)
	プロジェクト内の全てのファイルへのユーザースクリプトの実行 (\f1-\f9 and \F1-\F9)
	高いレベルでのユーザー設定機能
	the XXXX://...という形式を用いるnetrwとの連携 (ftp, rcp, scp, http)

これら全てはシンプルテキストとvimrc内のいくつかのグローバル変数に
記述します。

必ず、noconpatible設定をvimrcファイルにセットしてください。
もしこのプラグインを使わない場合には、vimrcに
	:let loaded_project = 1
を記述してください。

==============================================================================
コマンド

このプラグインを使うために、 ~/.vim/pluginディレクトリに設置してください。
次に、このプラグインを使うためには、
    :Project
or
    :Project {file}
以上のコマンドを実行します。

特にファイルを指定しない場合は、$HOME/.vimprojects が読み込まれます。

起動時一緒にProjectのウインドウを起動するためには、
	vim +Project
として起動します。

Note 一つのファイルに対しては一度しか :Projectを実行できません。
もし、Projectのファイルを変更したい場合は、
Projectバッファ内で:bwipeを実行した後、プラグインを再実行して下さい。

複数のプロジェクトが{ }で区切られて同じファイルで表示されます。
プロジェクト階層の中に複数のプロジェクトをネストすることができます。
{ } で表示されていない行はファイル名とみなします。
空行と#以降の文字は無視されます。

Vimの通常の折り畳み機能を使っているため、そのまま折り畳みコマンドが
使えます(zaで開閉、zaで再帰開閉など) 最初の行をダブルクリックすると
その折り畳みが開いたり閉じたりします。ファイル名上にカーソルを置いて
<Returen>またはダブルクリックでファイルが右側に表示されます。
もしファイルが存在していれば右側にウインドウを作り、
CTRL-W_p(右のウインドウに移動)を使ったのと同等の動きをします。

それぞれのプロジェクトのエントリは以下の形式です:

project_entry ::=
	<Description>={projpath} [{options}] {
	[ filename ]
	[ project_entry ]
	}

{options} は、ひとつ以上を同じ行に記述します:

CD={path}
	in={filename}
	out={filename}
	filter="{pat}"
	flags={flag}

Note プロジェクトエントリ内にプロジェクトエントリが存在できます。
これでプロジェクトの階層をセットアップできます。

<Description>部分は、折り畳みの際にも表示されますが=を含めません。
また=の横にはスペースを記述できません。

{projpath}はファイルが存在するパスで、環境変数なども含められます。
相対パスの場合、プラグインはパスをプロジェクトの親や親の親から構築します。
基本的に、プロジェクトエントリは、絶対パスで指定してください。
以下にプロジェクトの継承の例を表記します。{projpath}は、スペースを
含める事ができます。しかし、Vimの通常のエスケープが必要です。
二つの同じディレクトリの例を示します:

	Example=/my/directory/with\ spaces {
	}
	Example="/my/directory/with spaces" {
	}

Windowsではこれがオススメです:

	Example="c:\My Documents" {
	}

しかし、これでも十分にスマートです:

	Example=c:\My\ Documents {
	}

CD= は折り畳みの中に入れる、ディレクトリを示します。
例えば、:makeでローカルのMakefileを使えるようにできます。
CD=. は、{projpath} と現在の作業ディレクトリの全てと同等なものになります。
もし、CDが省かれたときは、ディレクトリは変更しません。
なお =. の横にはスペースは記述できません。CDは相対パスも可能です。
project-inheritanceの例をご覧ください。このやり方は、netrw プロジェクトから
無視されています。{projpath}と同様にスペースもパスの中に記述できます。

in= と out= は、ファイルバッファに入ったとき、出た時に、実行される
vimスクリプトです。次のように環境を立ち上げたり、終了させたりする
ことができます:

in.vim: >
	let $PROJECT_HOME='~/my_project'
	" Put the compiler in $PATH
	if $PATH !~ '/path/to/my/compiler'
		let $PATH=$PATH.':/path/to/my/compiler'
	endif

out.vim: >
	" Remove compiler from $PATH
	if $PATH =~ '/path/to/my/compiler'
		let $PATH=substitute($PATH, ':/path/to/my/compiler', '', 'g')
	endif

これで現在編集中のファイルに会わせて適切な環境で:makeすることができます。
もしスクリプトへのパスが相対パスの場合は、{projpath}からの相対パスに
なります。この設定はサブプロジェクトで設定しない限り、サブプロジェクトに
継承されます。netrwプロジェクトを使うたまには、 in=とout=が絶対パスか
ローカルとなるようにパス設定してください。

filter= は glob()の ファイルパターンを記述します。 \r (<LocalLeade>r) で。
ファイルのリストを再生成します。フィルタの値は存在しなくてはならず、
複数のファイルパターンを含められます。もしフィルタが省略された場合、
* がパターンとして使われます。 =.の横にはスペースは記述できず、
サブプロジェクトもそこで記述しない限り設定を継承します。

flag= は特に折り畳みに関する機能を設定できます。
一般的なニーモニックスキーマは、小文字でオフ、大文字でオンを表します。
{flag} には以下のものがあります。
charactors:

	フラグ	説明
	l	再帰的な不折り畳みの設定
	r	表示された時にリフレッシュするかどうか(非再帰)
	S	リフレッシュや作成時にソートする
	s	リフレッシュや作成時にソートしない
	T	リストの上方への重力のオン
	t	リストの上方への重力オフ(リフレッシュ時)
	w	再帰的な折り畳みのオフ

フラグはサブプロジェクトに継承されません。

折り畳みの外側の文字は無視されます。

==============================================================================
継承

二つのプロジェクトファイルを比べて継承を紹介します。

	Parent=~/my_project CD=. filter="Make* *.mk" flags=r {
	 Child1=c_code {
	 }
	 Child2=include CD=. filter="*.h" {
	 }
	}

Child1のパスは~/my_project/c_codeです。
これは ~/my_projectから継承します。なおCDも継承します。
ここでは、親のCDは.となっています。
親のパスは~/my_projectです。
Child1は、CDの~/my_projectを継承している事になります。
最後にChild1はフィルタを親から継承します。しかしフラグは継承しません。

Child2は~/my_projectのみを継承しています。

以下は、全てを継承無しに同等に書いた場合です。
>
	Parent=~/my_project CD=. filter="Make* *.mk" flags=r {
	 Child1=~/my_project/c_code CD=~/my_project filter="Make* *.mk" {
	 }
	 Child2=~/my_project/include CD=~/my_project/include filter="*.h" {
	 }
	}

実際のプロジェクトでは、Child1は、親のフィルタを継承したくないはずです。
これは、コンセプトだけを示す例です。なお、\iでいつでも
プロジェクトの継承の状態をを表示することができます。

==============================================================================
マッピング

マッピング	アクション ~

\r	プロジェクトのリフレッシュ、リフレッシュで消えないようにするには、
	行末に# pragma keepを記述。ちなみにnetrwは利用していない。
\R	再帰的な\r
\c	対話形式でプロジェクトエントリを作成
\C	フォルダ再帰的な\c
<Return>
	ファイルを開きそのウインドウにカーソルを移動
<S-Return>
\s
	水平報告にファイルを開き、そのウインドウにカーソルを移動
\S
	プロジェクト内のファイルを全て読み込み垂直方向に分割表示(危険!)
<C-Return>
\o
	新しいウインドウでファイルを開く。
<M-Return>
\v
	新しくファイルを開くがカーソルはそのまま。
<2-LeftMouse>
	ダブルクリックと一緒
<S-2-LeftMouse>
	<S-Return>と一緒
<C-2-LeftMouse>
	<C-Return>と一緒
<RightMouse>
	プロジェクトウインドウの枠を広げ最大化したり、戻したりする
	toggle between a width of
		g:proj_window_width + g:proj_window_increment
	and
		g:proj_window_width.
<space>
	<RightMouse>と一緒
<CTRL-Up>
\<Up>
	ファイルの一覧上で上方向に並べ替えしながら移動
<CTRL-Down>
\<Down>
	ファイルの一覧上で下方向に並べ替えしながら移動

\i	今のプロジェクトのステータスや継承関係を表示
\I	ファイルの完全修飾名を表示
\1 - \9
	g:proj_run{x}で設定しておいたのコマンドを起動
	詳しくは、設定のg:proj_run1 ...  g:proj_run9の項を参照

\f1-\f9
\F1-\F9
	g:proj_run_fold{x}で設定しておいたコマンドを実行
	詳しくは、設定のg:proj_run_fold1 ...  g:proj_run_fold9を参照
\0	1-9に登録してあるコマンドを表示
\f0	f1-f9登録してある登録してるコマンドを表示
\l	今のプロジェクトのファイルを読み込む
\L	今のプロジェクトのサブプロジェクトも含めてファイルを読み込む
\w	今のプロジェクトの読み込んでいるファイルを閉じる。保存もされる。
\W	今のプロジェクトのサブプロジェクトも含めてファイルを閉じ、保存する。
\g	今のプロジェクトのファイルをgrepする
\G	今のプロジェクトのサブプロジェクトも含めてgrepする
\e	現在のプロジェクトの環境設定をセットアップする
\E	今いるプロジェクトのパスからファイルエクスプローラーを起動する
<F12>	'g' フラグが g:proj_flags に設定されているなら、
	ウインドウの開閉をトグルする

==============================================================================
マッピング追加

($HOME/.vimproject_mappingsで、マッピングを追加できますが、翻訳を省略します。
 :help projectを参照ください。すみません。)

==============================================================================
設定

(翻訳を省略します。:help projectを参照ください。すみません。)

==============================================================================
プロジェクトファイルの設定例

~/.vimprojects の設定例です。

  1	My Project=~/c/project CD=. in=in.vim out=out.vim flags=r {
  2	 Makefile
  3      in.vim
  4      out.vim
  5	 GUI Files=. filter="gui*.c gui*.h" {
  6	  gui_window.c
  7	  gui_dialog.c
  8	  gui_list.c
  9	  gui.h	       # Header file
 10	 }
 11	 Database Files=. filter="data*.c data*.h" {
 12	  data_read.c
 13	  data_write.c
 14	  data.h
 15	 }
 16	 OS-Specific Files {
 17	  Win32=. filter="os_win32*.c os_win32*.h" {
 18	   os_win32_gui.c
 19	   os_win32_io.c
 20	  }
 21	  Unix=. filter="os_unix*.c os_unix*.h" {
 22	   os_unix_gui.c
 23	   os_unix_io.c
 24	  }
 25	 }
 26	}

(数字は、%s/^ \+[0-9]\+\t//g などで置換して数字は取り除いてください。)

==============================================================================
TIPS

1.  以下のように入力してプロジェクトエントリを作成できます。

	Label=~/wherever CD=. filter="*.c *.h" {
	}
<
    入力した後に\rを押します。そうするとディレクトリから、ファイルが
    読み込まれます。これは\cのウィザードをダイアログ形式でなくやる方法です。


2.  プロジェクトファイルは、ファイルを追加、削除、並べ直しをファイルのリスト
    上でいつでもおこなうことができます。

3.  一度閉じてしまったプロジェクトを再度開く際は、
	:Project
    と入力するだけで大丈夫です。

    もし、g:proj_flagsに'm'が設定されていると、CTRL-W_oでもう一度表示させる
    ことができます。

4.  プロジェクトにファイルを足す簡単な方法があります。
    普通に、プロジェクトエントリ内にファイルを挿入、記述してください。

5.  quickfixがファイルを読み込む際、ファイルの変更が適用されない時があるれど、
    \Lを押す事でファイルが再帰的に読み込み直されます。

6.  再帰的に全て折りたたみたい際にはzMが利用できます。

7.  上級者向け、 function Project_GetAllFnames()でプロジェクトのファイル名
    をサブプロジェクトを含めて取得できます。他にも、Project_ForEach()、
    Project_GetFname(line_number)などがあります。

8.  :Projectを\Pで実行する以下の設定をvimrcに記述すると便利です。
    このコマンドでカレントディレクトリの.vimprojectsを読み込みます。
>
    	nmap <silent> <Leader>P :Project<CR>
<

9.  .エントリが消えないようにしてプロジェクト内に置きたい場合、
    コメントとして
>
	. # pragma keep
<
    のように記述します。

以上
project.txtの原文
*project.txt*	Plugin for managing multiple projects with multiple sources
		For Vim version 6.x and Vim version 7.x.
		Last Change: Fri 13 Oct 2006 10:20:13 AM EDT


				By Aric Blumer
		      aricvim email-at-sign charter.net

						    *project* *project-plugin*
	Contents:

		Commands...................|project-invoking|
		Inheritance.............|project-inheritance|
		Mappings...................|project-mappings|
		Adding Mappings.....|project-adding-mappings|
		Settings...................|project-settings|
		Example File................|project-example|
		Tips...........................|project-tips|


You can use this plugin's basic functionality to set up a list of
frequently-accessed files for easy navigation. The list of files will be
displayed in a window on the left side of the Vim window, and you can press
<Return> or double-click on filenames in the list to open the files. I find
this easier to use than having to navigate a directory hierarchy with the
|file-explorer|.

You can also instruct the Plugin to change to a directory and to run Vim
scripts when you select a file. These scripts can, for example, modify the
environment to include compilers in $PATH. This makes it very easy to use
quickfix with multiple projects that use different environments.

Other features include:
	o Loading/Unloading all the files in a Project (\l, \L, \w, and \W)
	o Grepping all the files in a Project (\g and \G)
	o Running a user-specified script on a file (can be used to launch an
	  external program on the file) (\1 through \9)
	o Running a user-specified script on all the files in a Project
	  (\f1-\f9 and \F1-\F9)
	o High degree of user-configurability
	o Also works with |netrw| using the XXXX://... notation where XXXX is
	  ftp, rcp, scp, or http.

All of this is specified within a simple text file and a few global variables
in your vimrc file.

You must set 'nocompatible' in your |vimrc| file to use this plugin. You can
stop the plugin from being loaded by setting the "loaded_project" variable: >
	:let loaded_project = 1


==============================================================================
COMMANDS						    *project-invoking*

You can use the plugin by placing it in your plugin directory (e.g.,
~/.vim/plugin). See |add-global-plugin|. When you start vim the next time, you
then enter the command >
    :Project
or >
    :Project {file}

If you do not specify the filename, $HOME/.vimprojects is used.

To have Vim come up with the Project Window enabled automatically (say, from a
GUI launcher), run Vim like this:  [g]vim +Project

Note that you can invoke :Project on only one file at a time.  If you wish to
change the Project File, do a :bwipe in the Project Buffer, then re-invoke the
Plugin as described above.

Several Projects can be kept and displayed in the same file, each in a fold
delimited by { and } (see |fold.txt|).  There can be any number of nested
folds to provide you with a Project hierarchy.  Any line without a { or a } in
the file is considered to be a filename.  Blank lines are ignored, and any
text after a # is ignored.

Because the plugin uses standard Vim folds, you can use any of the
|fold-commands|. You can double-click on the first line of a fold to open and
close it. You can select a file to open by putting the cursor on its name and
pressing <Return> or by double-clicking on it.  The plugin will create a new
window to the right or use the |CTRL-W_p| equivalent if it exists.

							      *project-syntax*
Each Project Entry has this form:

project_entry ::=
    <Description>={projpath} [{options}] {
	[ filename ]
	[ project_entry ]
    }

{options} is one or more of the following (on the same line):
    CD={path}
    in={filename}
    out={filename}
    filter="{pat}"
    flags={flag}

Note that a project_entry can reside within a project_entry. This allows you
to set up a hierarchy within your Project.

The <Description> will be displayed in the foldtext and cannot contain "=".
There can be no space character directly on either side of the =.

The {projpath} is the path in which the files listed in the Project's fold
will be found, and it may contain environment variables.  If the path is a
relative path, then the plugin constructs the whole path from the Project's
parent, grandparent, etc., all the way up the hierarchy. An outermost
project_entry must have an absolute path.  See the |project-inheritance|
example below.  {projpath} may contain spaces, but they must be escaped like
normal Vim escapes. Here are two examples of the same directory:
>
	Example=/my/directory/with\ spaces {
	}
	Example="/my/directory/with spaces" {
	}

I recommend this for Windows〓: >

	Example="c:\My Documents" {
	}

But Vim is smart enough to do this, too: >

	Example=c:\My\ Documents {
	}

CD= provides the directory that Vim will change to when you select a file in
that fold (using |:cd|). This allows you, for example, to enter |:make| to use
the local Makefile.  A CD=. means that Vim will make {projpath} or its
inherited equivalent the current working directory.  When CD is omitted, the
directory is not changed.  There can be no space on either side of the =.  The
value of CD can also be a relative path from a parent's CD.  See the
|project-inheritance| example below.  This directive is ignored for |netrw|
projects. Spaces are allowed in the path as for {projpath}.

in= and out= provide the means to run arbitrary Vim scripts whenever you enter
or leave a file's buffer (see the |BufEnter| and |BufLeave| autocommand
events).  The idea is to have a Vim script that sets up or tears down the
environment for the Project like this:

in.vim: >
	let $PROJECT_HOME='~/my_project'
	" Put the compiler in $PATH
	if $PATH !~ '/path/to/my/compiler'
		let $PATH=$PATH.':/path/to/my/compiler'
	endif

out.vim: >
	" Remove compiler from $PATH
	if $PATH =~ '/path/to/my/compiler'
		let $PATH=substitute($PATH, ':/path/to/my/compiler', '', 'g')
	endif

Then you can use :make with the proper environment depending on what file you
are currently editing.  If the path to the script is relative, then it is
relative from {projpath}.  These directives are inherited by Subprojects
unless the Subproject specifies its own. For use with |netrw| projects, the
paths specified for in= and out= must be absolute and local.

filter= specifies a |glob()| file pattern. It is used to regenerate the list
of files in a Project fold when using the \r (<LocalLeader>r) map in the
Project Window.  The filter value must be in quotes because it can contain
multiple file patterns.  If filter is omitted, then the * pattern is used.
There can be no space on either side of the =.  A Subproject will inherit the
filter of its parent unless it specifies its own filter.

flags= provides the means to enable/disable features for a particular fold.
The general mnemonic scheme is for lower case to turn something off and upper
case to turn something on.  {flag} can contain any of the following
characters:

      flag      Description ~

	l	Turn off recursion for this fold for \L.  Subfolds are also
	        blocked from the recursion.

	r	Turn off refresh. When present, do not refresh this fold when
		\r or \R is used.  This does not affect subfold recursion.

	S	Turn on sorting for refresh and create.

	s	Turn off sorting for refresh and create.

	T	Turn on top gravity.  Forces folds to the top of the current
		fold when refreshing. It has the same affect as the 'T' flag
		in g:proj_flags, but controls the feature on a per-fold basis.

	t	Turn off top gravity.  Forces folds to the bottom of the
	        current fold when refreshing.

	w	Turn off recursion for this fold for \W.  Subfolds are also
	        blocked from the recursion.


Flags are not inherited by Subprojects.

Any text outside a fold is ignored.


==============================================================================
INHERITANCE						 *project-inheritance*

It's best to show inheritance by comparing these two Project Files:
>
	Parent=~/my_project CD=. filter="Make* *.mk" flags=r {
	 Child1=c_code {
	 }
	 Child2=include CD=. filter="*.h" {
	 }
	}

Child1's path is "~/my_project/c_code" because ~/my_project is inherited.  It
also inherits the CD from Parent.  Since Parent has CD=., the Parent's cwd is
"~/my_project".  Child1 therefore inherits a CD of "~/my_project".  Finally,
Child1 inherits the filter from Parent. The flags are not inherited.

Child2 only inherits the "~/my_project" from Parent.

Thus, the example above is exactly equivalent to this:
>
	Parent=~/my_project CD=. filter="Make* *.mk" flags=r {
	 Child1=~/my_project/c_code CD=~/my_project filter="Make* *.mk" {
	 }
	 Child2=~/my_project/include CD=~/my_project/include filter="*.h" {
	 }
	}

(For a real Project, Child1 would not want to inherit its parent's filter, but
this example shows the concept.)  You can always enter \i to display what the
cursor's project inherits.


==============================================================================
MAPPINGS						    *project-mappings*

Map	Action ~

\r	Refreshes the Project fold that the cursor is in by placing in the
	fold all the files that match the filter. The Project is refreshed
	using an indent of one space for every foldlevel in the hierarchy.

	You may place a "# pragma keep" (without the quotes) at the end of a
	line, and the file entry on that line will not be removed when you
	refresh.  This is useful, for example, when you have . as an entry so
	you can easily browse the directory.

	Note that this mapping is actually <LocalLeader>r, and the default of
	|<LocalLeader>| is \.

	This does not work for Projects using |netrw|.

\R	Executes \r recursively in the current fold and all folds below.
	This does not work for Projects using |netrw|.

\c	Creates a Project fold entry.  It asks for the description, the path
	to the files, the CD parameter, and the filename |glob()| pattern.
	From this information, it will create the Project Entry below the
	cursor.

	This does not work for Projects using |netrw|.

\C	Creates a Project fold entry like \c, but recursively includes all the
	subdirectories.

<Return>
	Select a file to open in the |CTRL-W_p| window or in a new window.  If
	the cursor is on a fold, open or close it.

<S-Return>
\s
	Same as <Return> but horizontally split the target window.
	<LocalLeader>s is provided for those terminals that don't recognize
	<S-Return>.

\S
	Load all files in a project by doing horizontal splits.

<C-Return>
\o
	Same as <Return> but ensure that the opened file is the only other
	window. <LocalLeader>o is provided for those terminals that don't
	recognize <C-Return>.

<M-Return>
\v
	Same as <Return> but only display the file--the cursor stays in the
	Project Window.

<2-LeftMouse>
	(Double-click) If on a closed fold, open it. If on an open fold
	boundary, close it. If on a filename, open the file in the |CTRL-W_p|
	window or in a new window.

<S-2-LeftMouse>
	Same as <S-Return>.

<C-2-LeftMouse>
	Same as <C-Return>.

<RightMouse>
	Increase the width of the Project Window by g:proj_window_increment or
	toggle between a width of
		g:proj_window_width + g:proj_window_increment
	and
		g:proj_window_width.

	Whether you toggle or monotonically increase the width is determined
	by the 't' flag of the g:proj_flags variable (see |project-flags|).

	Note that a Right Mouse click will not automatically place the cursor
	in the Project Window if it is in a different window.  The window will
	go back to the g:proj_window_width width when you leave the window.

<space> Same as <RightMouse>

<CTRL-Up>
\<Up>
	Move the text or fold under the cursor up one row. This may not work
	in a terminal because the terminal is unaware of this key combination.
	<LocalLeader><Up> is provided for those terminals that don't recognize
	<C-Up>.


<CTRL-Down>
\<Down>
	Move the text or fold under the cursor down one row. This may not work
	in a terminal because the terminal is unaware of this key combination.
	<LocalLeader><Down> is provided for those terminals that don't
	recognize <C-Down>.

\i	Show in the status line the completely resolved and inherited
	parameters for the fold the cursor is in.  This is intended for
	debugging your relative path and inherited parameters for manually
	entered Projects.

\I	Show in the status line the completely resolved filename.  Uses the
        Project_GetFname(line('.')) function.

\1 - \9
	Run the command specified in g:proj_run{x} where {x} is the number
	of the key.  See the documentation of g:proj_run1 below.

\f1-\f9
	Run the command specified in g:proj_run_fold{x} where {x} is the
	number of the key.  The command is run on the files at the current
	Project level. See the |project-settings| below.

\F1-\F9
	Run the command specified in g:proj_run_fold{x} where {x} is the
	number of the key.  The command is run on the files at the current
	Project level and all Subprojects. See the |project-settings| below.

\0	Display the commands that are defined for \1 through \9.

\f0	Display the commands that are defined for \f1 through \f9 and \F1
	through \F0.  Same as \F0.

\l	Load all the files in the current Project level into Vim.  While files
	are being loaded, you may press any key to stop.

\L	Load all the files in the current Project and all Subprojects into
	Vim.  Use this mapping with caution--I wouldn't suggest using \L to
	load a Project with thousands of files. (BTW, my Project file has more
	than 5,300 files in it!)  While files are being loaded, you may press
	any key to stop.

\w	Wipe all the files in the current Project level from Vim. (If files
	are modified, they will be saved first.)  While files are being wiped,
	you may press any key to stop.

\W	Wipe all the files in the current Project and all Subprojects from
	Vim. (If files are modified, they will be saved first.)  While files
	are being wiped, you may press any key to stop.

\g	Grep all the files in the current Project level.

\G	Grep all the files in the current Project level and all Subprojects.

\e	Set up the Environment for the Project File as though you had selected
	it with <Return>.  This allows you to do a \e and a :make without
	having to open any files in the project.

\E	Explore (using |file-explorer|) the directory of the project the
	cursor is in.  Does not work with netrw.

<F12>	When the 'g' flag is present in g:proj_flags (see |project-flags|)
	this key toggles the Project Window open and closed. You may remap
	this toggle function by putting the following in your vimrc and
	replacing <Leader>P with whatever key combination you wish:

		nmap <silent> <Leader>P <Plug>ToggleProject

Note that the Project Plugin remaps :help because the Help Window and the
Project Window get into a fight over placement. The mapping avoids the
problem.

==============================================================================
ADDING MAPPINGS 				     *project-adding-mappings*

You can add your own mappings or change the mappings of the plugin by placing
them in the file $HOME/.vimproject_mappings.  This file, if it exists, will be
sourced when the plugin in loaded.  Here is an example that will count the
number of entries in a project when you press \K (Kount, C is taken :-): >

    function! s:Wc()
        let b:loadcount=0
        function! SpawnExec(infoline, fname, lineno, data)
	    let b:loadcount = b:loadcount + 1
	    if getchar(0) != 0 | let b:stop_everything=1 | endif
        endfunction
        call Project_ForEach(1, line('.'), "*SpawnExec", 0, '')
        delfunction SpawnExec
        echon b:loadcount." Files\r"
        unlet b:loadcount
        if exists("b:stop_everything")
	    unlet b:stop_everything
	    echon "Aborted.\r"
	endif
    endfunction

    nnoremap <buffer> <silent> <LocalLeader>K :call <SID>Wc()<CR>

Here's another example of how I integrated the use of perforce with the plugin
in my $HOME/.vimproject_mappings:
>
	function! s:DoP4(cmd)
	   let name=Project_GetFname(line('.'))
	   let dir=substitute(name, '\(.*\)/.*', '\1', 'g')
	   exec 'cd '.dir
	   exec "!".a:cmd.' '.Project_GetFname(line('.'))
	   cd -
	endfunction

	nmap <buffer> <silent> \pa :call <SID>DoP4("p4add")<CR>
	nmap <buffer> <silent> \pe :call <SID>DoP4("p4edit")<CR>
<
(Note that I CD to the directory the file is in so I can pick of the $P4CONFIG
file. See the perforce documentation.)

This creates the mappings \pe to check out the file for edit and \pa to add
the file to the depot.

Here is another example where I remap the <Return> mapping to use an external
program to launch a special kind of file (in this case, it launches ee to view
a jpg file).  It is a bit contrived, but it works.
>
	let s:sid = substitute(maparg('<Return>', 'n'), '.*\(<SNR>.\{-}\)_.*', '\1', '')
	function! s:LaunchOrWhat()
	    let fname=Project_GetFname(line('.'))
	    if fname =~ '\.jpg$'
		exec 'silent! !ee "'.fname.'"&'
	    else
		call {s:sid}_DoFoldOrOpenEntry('', 'e')
	    endif
	endfunction
	nnoremap <buffer> <silent> <Return>   \|:call <SID>LaunchOrWhat()<CR>
<
If the file ends in .jpg, the external program is launched, otherwise the
original mapping of <Return> is run.

==============================================================================
SETTINGS						    *project-settings*

You can set these variables in your vimrc file before the plugin is loaded to
change its default behavior

g:proj_window_width
	The width of the Project Window that the plugin attempts to maintain.
	Default: 24

	The Project Plugin is not always successful in keeping the window
	where I want it with the size specified here, but it does a decent
	job.

g:proj_window_increment
	The increment by which to increase the width of the Project Window
	when pressing <space> or clicking the <LeftMouse>. Default: 100
	(See |project-mappings|.)

							       *project-flags*
g:proj_flags
	Default: "imst"
	Various flags to control the behavior of the Project Plugin.  This
	variable can contain any of the following character flags.

       flag	Description ~

	b	When present, use the |browse()| when selecting directories
		for \c and \C.  This is off by default for Windows, because
		the windows browser does not allow you to select directories.

	c	When present, the Project Window will automatically close when
		you select a file.

	F	Float the Project Window.  That is, turn off automatic
		resizing and placement.  This allows placement between other
		windows that wish to share similar placement at the side of
		the screen.  It is also particularly helpful for external
		window managers.

	g	When present, the mapping for <F12> will be created to toggle
		the Project Window open and closed.

	i	When present, display the filename and the current working
		directory in the command line when a file is selected for
		opening.

	l	When present, the Project Plugin will use the |:lcd| command
		rather than |:cd| to change directories when you select a file
		to open.  This flag is really obsolete and not of much use
		because of L below.

	L	Similar to l, but install a BufEnter/Leave |:autocommand| to
		ensure that the current working directory is changed to the
		one specified in the fold CD specification whenever that
		buffer is active.  (|:lcd| only changes the CWD for a window,
		not a buffer.)

	m	Turn on mapping of the |CTRL-W_o| and |CTRL-W_CTRL_O| normal
	        mode commands to make the current buffer the only visible
		buffer, but keep the Project Window visible, too.

	n	When present, numbers will be turned on for the project
	        window.

	s	When present, the Project Plugin will use syntax highlighting
		in the Project Window.

	S	Turn on sorting for refresh and create.

	t	When present, toggle the size of the window rather than just
		increase the size when pressing <space> or right-clicking.
		See the entry for <RightMouse> in |project-mappings|.

	T	When present, put Subproject folds at the top of the fold when
		refreshing.

	v	When present, use :vimgrep rather than :grep when using \G.

g:proj_run1 ...  g:proj_run9
		Contains a Vim command to execute on the file.  See the
		mappings of \1 to \9 above.

		  %f is replaced with the full path and filename
		  %F is replaced with the full path and filename with spaces
		     quoted
		  %n is replaced with the filename alone
		  %N is replaced with the filename alone with spaces quoted
		  %h is replaced with the home directory
		  %H is replaced with the home directory with spaces quoted
		  %r is replaced with the directory relative to the CD path
		  %R is replaced with the directory relative to the CD path
		     with spaces quoted
		  %d is replaced with the CD directory.
		  %D is replaced with the CD directory.with spaces quoted
		  %% is replaced with a single % that is not used in
		     expansion.

		(Deprecated: %s is also replaced with the full path and
		filename for backward compatibility.)

		For example, gvim will be launched on the file under the
		cursor when you enter \3 if the following is in your vimrc
		file: >
		 let g:proj_run3='silent !gvim %f'
<		Here are a few other examples: >
		 let g:proj_run1='!p4 edit %f'
		 let g:proj_run2='!p4 add %f'
		 let g:proj_run4="echo 'Viewing %f'|sil !xterm -e less %f &"
<
		On Windows systems you will want to put the %f, %h, and %d in
		single quotes to avoid \ escaping.

g:proj_run_fold1 ...  g:proj_run_fold9
		Contains a Vim command to execute on the files in a fold.  See
		the mappings of \f1 to \f9  and \F1 to \F9 above.

		%f is the filename, %h is replaced with the project home
		directory, and %d is replaced with the CD directory.  Multiple
		filenames can be handled in two ways:

		The first (default) way is to have %f replaced with all the
		absolute filenames, and the command is run once.  The second
		is to have the command run for each of the non-absolute
		filenames (%f is replaced with one filename at a time).  To
		select the second behavior, put an '*' character at the
		beginning of the g:proj_run_fold{x} variable.  (The '*' is
		stripped before the command is run.)

		For example, note the difference between the following: >
		 let g:proj_run_fold3="*echo '%h/%f'"
		 let g:proj_run_fold4="echo '%f'"
<
		Note that on Windows systems, you will want the %f, %h, and %c
		within single quotes, or the \ in the paths will cause
		problems.  The alternative is to put them in |escape()|.


==============================================================================
PROJECT EXAMPLE FILE					     *project-example*

Here is an example ~/.vimprojects file: >

  1	My Project=~/c/project CD=. in=in.vim out=out.vim flags=r {
  2	 Makefile
  3      in.vim
  4      out.vim
  5	 GUI Files=. filter="gui*.c gui*.h" {
  6	  gui_window.c
  7	  gui_dialog.c
  8	  gui_list.c
  9	  gui.h	       # Header file
 10	 }
 11	 Database Files=. filter="data*.c data*.h" {
 12	  data_read.c
 13	  data_write.c
 14	  data.h
 15	 }
 16	 OS-Specific Files {
 17	  Win32=. filter="os_win32*.c os_win32*.h" {
 18	   os_win32_gui.c
 19	   os_win32_io.c
 20	  }
 21	  Unix=. filter="os_unix*.c os_unix*.h" {
 22	   os_unix_gui.c
 23	   os_unix_io.c
 24	  }
 25	 }
 26	}

(Don't type in the line numbers, of course.)


==============================================================================
TIPS ON USING PROJECT PLUGIN					*project-tips*

1.  You can create a Project Entry by entering this: >

	Label=~/wherever CD=. filter="*.c *.h" {
	}
<
    Then you can put the cursor in the fold and press \r. The script will fill
    in the files (C files in this case) from this directory for you.  This is
    equivalent to \c without any dialogs.

2.  You can edit the Project File at any time to add, remove, or reorder files
    in the Project list.

3.  If the Project Window ever gets closed, you can just enter >
	:Project
<   to bring it back again. (You don't need to give it the filename; the
    plugin remembers.)

    If you have the 'm' flag set in g:proj_flags, then you get the Project
    Window to show up again by pressing |CTRL-W_o|. This, of course, will
    close any other windows that may be open that the cursor is not in.

4.  Adding files to a Project is very easy.  To add, for example, the 'more.c'
    file to the Project, just insert the filename in the Project Entry then
    hit <Return> on it.

5.  When |quickfix| loads files, it is not equivalent to pressing <Return> on
    a filename, so the directory will not be changed and the scripts will not
    be run. (If I could make this otherwise, I would.)  The solution is to use
    the \L key to load all of the files in the Project before running
    quickfix.

6.  If the Project window gets a bit cluttered with folds partially
    open/closed, you can press |zM| to close everything and tidy it up.

7.  For advanced users, I am exporting the function Project_GetAllFnames()
    which returns all the filenames within a fold and optionally all its
    Subprojects.  Also, I export Project_ForEach() for running a function for
    each filename in the project. See the code for examples on how to use
    these. Finally, I export Project_GetFname(line_number) so that you can
    write your own mappings and get the filename for it.

8.  Some people have asked how to do a global mapping to take the cursor to
    the Project window. One of my goals for the plugin is for it to be as
    self-contained as possible, so I'm not going to add it by default. But you
    can put this in your vimrc:
>
    	nmap <silent> <Leader>P :Project<CR>

<
9.  You can put the . entry in a project, and it will launch the
    |file-explorer| plugin on the directory.  To avoid removal when you
    refresh, make the entry look like this:
>
 	. # pragma keep
<
==============================================================================
THANKS

	The following people have sent me patches to help with the Project
	Plugin development:

		Tomas Zellerin
		Lawrence Kesteloot
		Dave Eggum
		A Harrison
		Thomas Link
		Richard Bair
		Eric Arnold
		Peter Jones
		Eric Van Dewoestine


 vim:ts=8 sw=8 noexpandtab tw=78 ft=help:
MacでCUIのさくらのレンタルサーバー上にssh+screen+vimでマウスで編集、慣性スクロール可能な開発環境を作成する方法
最近電気代のことも考えて、CentOS 5.5で立てていた自宅サーバーを、さくらのレンタルサーバー(月々500円のスタンダードプラン FreeBSD 8.1)に移行しました。
その際にやった、sshを介して使うscreenとvim、あとvimプラグイン群による、マウス操作可能な開発環境作成についてまとめました。
自分自身、WindowsでもMacOSXでもずっとGVimを使っていたこともあり、どうもオペレーターやテキストオブジェクトを使ってマウスを一切に使わないでVimを利用するスタイルというものが苦手でした。できるけど、そんなに速く編集できない...。
せっかくマウスがあるのだし、マウスを使った範囲指定やMacのトラックパッドを使ったなめらかな慣性スクロールを利用して素早く開発したいですよね。こっちのほうが頭にやさしいです。
例をあげると
<a href="http://hoge"><a>
以上のテキストでカーソルが行頭にある際に、以上のhogeをfugaに編集する場合、
4wci"http://fuga
みたいなのを考えて打つより、hogeをドラッグ選択して
cfuga
の方が楽に編集できますよね。
というわけで、そのような操作が可能な環境の作り方を今から紹介していきます。

最終的にどのような開発環境になるかというと以下のような機能の
- sshで繋ぐGUIのないサーバー(UNIX, Linux)上において以下のGUI独特の操作が可能
- クリックによるカーソル移動
- ドラッグによる範囲選択
- ダブルクリックによるタグジャンプ
- 慣性スクロールによるなめらかな文書スクロール
- ウインドウ分割した際のサッシのドラッグによるウインドウ幅調整
- screenを利用し、回線切断、シャットダウンの際にも編集状態のセッションを復元可能
- EclipseのようなIDEと同様な高度な機能
以上のような環境となります。
Eclipseを7年使ってきましたが、そのEclipseに劣らないほどの強力な開発環境だと思いませんか?
Eclipseは起動に1分かかることもありますが、このvimの開発環境、起動に1秒もかかりません。更にクライアントマシンがシャットダウンしても編集状態が残るという素晴らしい環境です。
というわけで、早速準備を始めます。
iTerm2のインストール
Development site for iTerm2
以上のDownloadsからiTerm2_v1_0_0.zipを選択してダウンロードし、アプリケーションフォルダに移動してインストール完了です。ちなみにTerminal.appがあるのに、なぜiTerm2を使うのかというと、
- 表示色に256色が表示できる(Preference...>Profiles>Colors>Load Presets)
- 以下のvimのマウス利用オプションが利用できる
" マウスモード有効
set mouse=a
" screen対応
set ttymouse=xterm2
以上2つの理由があるからです。
その他にもタブ管理やウインドウ管理機能が充実してたり、クリップボード履歴を利用する機能があります。興味がある人はいろいろいじってみると面白いです。ただし、Terminal.appに比べると描画が2倍ぐらい遅いです。大量にコンソールにプリントするアプリを動かす際には要注意ですが、普段は気にならないと思います。
sshでさくらのサーバーにログインの後、git+vim+ctags+screenのインストール
次に早速sshでUNIXまたはLinuxサーバーにつないでみましょう。
$ ssh username@www0000.sakura.ne.jp
以上でログインし、入力を求められるのでパスワードを入力します。さくらのレンタルサーバーはFreeBSD 8.1でデフォルトがcshでしたが、そのまま進めていきます。
ちなみに自分はzshに変更していますがその辺はお好みで。まずはホームディレクトリへのソフトウェアのインストールを進めていきます。ここが一番長いですが頑張りましょう。
$ mkdir -p ~/local/source
$ cd ~/local/source
$ wget http://git-core.googlecode.com/files/git-1.7.9.6.tar.gz
$ tar zxvf git-1.7.9.6.tar.gz
$ cd git-1.7.9.6
$ make prefix=$HOME/local
$ make prefix=$HOME/local install
$ cd ..
$ wget http://hp.vector.co.jp/authors/VA025040/ctags/downloads/ctags-5.8j2.tar.gz
$ tar zxvf ctags-5.8j2.tar.gz
$ cd ctags-5.8j2
$ ./configure --prefix=$HOME/local
$ make
$ make install
$ cd ..
$ wget ftp://ftp.vim.org/pub/vim/unix/vim-7.3.tar.bz2
$ tar -jxf vim-7.3.tar.bz2
$ cd vim73
$ ./configure --enable-multibyte --enable-xim --enable-fontset --with-features=big --prefix=$HOME/local
$ make
$ make install
$ cd ..
$ wget ftp://ftp.uni-erlangen.de/pub/utilities/screen/screen-4.0.3.tar.gz
$ tar xzf screen-4.0.3.tar.gz
$ cd screen-4.0.3
$ ~/local/bin/vim pty.c
/* for solaris 2.1, Unixware (SVR4.2) and possibly others */
#ifdef HAVE_SVR4_PTYS
# include <sys/stropts.h>
#endif
無事コメントアウトしたら、
$ ./configure --prefix=$HOME/local
$ make
$ make install
$ ~/local/bin/vim .cshrc
.cshrcを編集して、今回ホームディレクトリにインストールしたものにパスを通したり、環境変数を設定したりします。
alias vi    vim
setenv EDITOR  vim
setenv LANG ja_JP.UTF-8
set path = (/sbin /bin /usr/sbin /usr/bin /usr/local/sbin /usr/local/bin $HOME/bin $HOME/local/bin)
以上のそれぞれの行を.cshrcに追加、または変更して設定します。
$ source ~/.cshrc
最後にこの設定を読み込みます。
これでひと通りのインストールは完了です。これでgitとvimとctagsとscreenがホームディレクトリ以下にインストールされました。
.screenrcの設定とscreenの利用
次は、早速.screenrcの設定などをしていきます。スクリーンの設定、コマンド一覧は、screenコマンド一覧を参考に。
$ vim ~/.screenrc
これで編集を開始して以下を記入します。
escape ^Tt
startup_message off
zombie

rdstatus alwayslastline "[%02c] %`%-w%{=b bw}%n %t%{-}%+w"
defencoding UTF-8
encoding UTF-8
termcapinfo * 'hs:ts=\E]2;:fs=\007:ds=\E]0;screen\007'
termcapinfo xterm 'is=\E[r\E[m\E[2J\E[H\E[?7h\E[?1;4;6l'
caption always "%{=r dd}%-Lw%40L>%?%F%{=b dR}%:[%? %n%f %t %?%F%{-}%:]%?%+Lw %?%F%-006=■■%:%=%?"
altscreen on
defscrollback 50000
autodetach on
#multiuser on
#acladd soichiro_yoshimura
この設定は、サーバー時刻を表示するキャプションを設定の他、回線が切れた時にオートデタッチするようにしています。
キーインはCtrl+Tです。スクリーンの利用はコンソールにてコマンドscreen、デタッチはCtrl+T d、再度のアタッチはコマンドscreen -rとなります。これだけ覚えておけばとりあえず使えます。
あと、画面スクロールのためのコピーモードへの入り方は、Ctrl+T [です。残念ながらここではマウスホイール等は使えません、vimやlessと同様のキー操作です(ただ、iTerm2の設定を変えるとスクロールできるようになります、このエントリの最後を参照)。他にも常にログを取ったり、パネルを分割したり、タブを使ったりもできますが、これらは他のレイヤーでも利用できますので、この機能しか使いません。これでMacBookProを閉じてsshが切断されたり、さくらのレンタルサーバーからの強制切断があっても大丈夫です。
というわけで早速screenを利用してみます。
$ screen
これで、途中でサーバーとの接続が不安定になっても自動的にデタッチされるので。切断されたら、sshで繋ぎ直しコマンドscreen -lsでセッションがあることを確認して、コマンドscreen -rで再度アタッチして作業をしましょう。
なお、さくらのレンタルサーバーではsshの接続が一つしかできないこともある時には、sceenのタブ機能が役に立ちます。詳しくは、screenコマンド一覧 3.9.13対応をご覧ください。
.vimrcの設定とvimプラグインのインストール
さて、次は、.vimrcの設定をやっていきます。
$ vim ~/.vimrc
で、.vimrcを編集します。自分の設定は以下の通りですが、好きなようにカスタマイズしてください。
")VimをなるべくVi互換にする
set nocompatible

"""""""""" NeoBundle設定 """"""""""
" https://github.com/Shougo/neobundle.vim
" インストール
" $ mkdir -p ~/.vim/bundle
" $ git clone https://github.com/Shougo/neobundle.vim ~/.vim/bundle/neobundle.vim
filetype plugin indent off     " required!
if has('vim_starting')
	set runtimepath+=~/.vim/bundle/neobundle.vim/
	call neobundle#rc(expand('~/.vim/bundle/'))
endif

" gitを使ったプラグインマネージャ
NeoBundle 'Shougo/neobundle.vim'

"""""""" github
" 強力な入力補完(Uniteと連携)
NeoBundle 'Shougo/neocomplcache'
" Uniteコマンドによる読み出し等
NeoBundle 'Shougo/unite.vim'
" ,,でトグルでコメントアウト
NeoBundle 'scrooloose/nerdcommenter'
" zendogingプラグイン
NeoBundle 'mattn/zencoding-vim'

""""""" vim-scripts repos
" プロジェクトのツリー表示
NeoBundle 'project.tar.gz'
" 括弧囲みの編集操作
NeoBundle 'surround.vim'
" :Tlistでctagsの一覧表示
NeoBundle 'taglist.vim'
" SVNの差分表示用 http://blog.blueblack.net/item_144
NeoBundle 'vcscommand.vim'

filetype on
filetype indent on
filetype plugin on

"""""""""" 追加設定 """"""""""
"バックスペースキーの動作を決定する
"2:indent,eol,startと同じ
set backspace=2

"行数表示
set number

"新しい行を開始したときに、新しい行のインデントを現在行と同じ量にする
set autoindent

"検索で小文字なら大文字を無視、大文字なら無視しない設定
set smartcase

"(no)検索をファイルの末尾まで検索したら、ファイルの先頭へループする
set nowrapscan

"インクリメンタルサーチを行う
set incsearch

"highlight matches with last search pattern
set hlsearch

"閉じ括弧が入力されたとき、対応する括弧を表示する
set showmatch

"カーソルが何行目の何列目に置かれているかを表示する
set ruler

"新しい行を作ったときに高度な自動インデントを行う
set smartindent

"保存しないで他のファイルを表示することが出来るようにする
set hidden

"カレントバッファ内のファイルの文字エンコーディングを設定する
set fileencoding=utf-8

"Insertモードで<Tab> を挿入するのに、適切な数の空白を使う
"set expandtab

"ファイル内の <Tab> が対応する空白の数
set tabstop=4

"自動インデントの各段階に使われる空白の数
set shiftwidth=4

"行頭の余白内で Tab を打ち込むと、'shiftwidth' の数だけインデントする
set smarttab

"強調表示(色付け)のON/OFF設定
syntax on

" カラースキーマ設定 (~/.vim/colors/wombat.vimが必要)
colorscheme wombat

"ステータスラインを表示するウィンドウを設定する
"2:常にステータスラインを表示する
set laststatus=2

"ステータス行の表示内容を設定する
set statusline=%<%f\ %m%r%h%w%{'['.(&fenc!=''?&fenc:&enc).']['.&ff.']'}%=%l,%c%V%8P

"vimのバックアップファイルとスワップファイル
set nobackup
set noswapfile

"バッファをクリップボードにコピー(for OSX, UNIXのgvim用)
set clipboard=unnamed,autoselect

"自動改行オフ
set tw=0

" neocomplcache 起動時に有効化
let g:neocomplcache_enable_at_startup = 1 " 起動時に有効化

" ,, でコメントアウトをトグル
let NERDSpaceDelims = 1
nmap ,, <Plug>NERDCommenterToggle
vmap ,, <Plug>NERDCommenterToggle

"コメントアウトが連続して入力されるのを禁止
autocmd FileType * setlocal formatoptions-=ro

"全角スペースを で表示
highlight JpSpace cterm=underline ctermfg=Blue guifg=Blue
au BufRead,BufNew * match JpSpace / /

"タブを見えるように設定
"set list
"set listchars=tab:>-

" サーチハイライトををESC二回で消す
nnoremap <Esc><Esc> :nohlsearch<CR><Esc>

" マウスモード有効
set mouse=a
" screen対応
set ttymouse=xterm2

" 挿入モードとノーマルモードでステータスラインの色を変更する
au InsertEnter * hi StatusLine guifg=DarkBlue guibg=DarkYellow gui=none ctermfg=Blue ctermbg=Yellow cterm=none
au InsertLeave * hi StatusLine guifg=Black guibg=White gui=none ctermfg=Black ctermbg=White cterm=none

"ctagsの埋め込み 各環境であるものを全て記述(なくても問題ない)
set tags=~/.tags,~/.tags.study
という感じにします。あと、カラースキームもiTermのデフォルトのカラープリセットで見やすいwombatに設定します。まだカラースキーマwombat.vimの実体がないので、以下の手順でダウンロードします。
$ mkdir -p ~/.vim/colors
$ cd ~/.vim/colors
$ wget http://www.vim.org/scripts/download_script.php?src_id=6657
$ cd ~
これでOKです。
あとは、必要プラグインのインストールをします。まず、プラグインマネージャのNeoBundleをまずはインストール。
$ mkdir -p ~/.vim/bundle
$ export GIT_SSL_NO_VERIFY=true
$ git clone https://github.com/Shougo/neobundle.vim ~/.vim/bundle/neobundle.vim
これでNeoBundleがインストールされます。
$ vim
以上でvimを立ち上げて
:NeoBundleInstall
を実行して、先程.vimrcに記述しておいた他の必要なプラグインをすべてインストールします。
これで環境構築は完了です。
project.vimの使い方は、
Project.vim - Vimでのプログラミングを猛烈に支援してくれるプラグイン
以上のサイトが、
ctagsとvimの連携に関しては
Vim でタグジャンプを使ってみる
以上のサイトなどが勉強になります。ぜひうまく利用してみて下さい。
なお、複数行して,,をコマンドするとコメントアウトのトグル操作。
以上の環境設定でで、sshを介してマウスを使ったscreen+vim開発環境は完成です。じっくりご堪能下さい。
自分はこの設定に加えて言語ごと(JavaScript, Ruby, PHP, Scala)のプラグインなどを入れています。その設定は、GitHub・sifue/dotfilesにもアップしてあるので参考にしてみてください。
ぜひおすすめのGoogle日本語入力の設定
もし、Google日本語入力を使っても良いというのであれば、ぜひ利用したほうが良いです。
なぜかというと、環境設定 > キーの設定 > 編集 で、Escを押した際に、IMEを無効にできるからです。これをやっておくとiTerm2上でコマンドラインモードなのに、日本語を入力して、うう..。ということがなくなります。この設定だけは本当におすすめです。
以下のように全ての状態において、Escapeが入力された際に、「キャンセル後IMEを無効化」を設定しておきます。これで

MacOSX上でのsshの画面のコピー操作
なお、sshのvim画面を範囲選択してMac上の選択したい時は、vim上で:set nonumberの後、altを押しながらドラッグで範囲選択すると綺麗にコピーできます。なお、alt + commandを押しながら選択すると矩形選択になります。これも便利。
iTerm2でscreen上でマウスでスクロールする設定
Preference... > Profiles > Terminal > Save lines to scrollback when an app status bar is present
以上の設定にチェックを入れておけばscreenを使った状態でもマウスでスクロールすることができます。
以上です。お疲れ様でした。
GitHubが生み出すソーシャルコーディングがOSSの世界を急速に進化させている
ここ2,3年でオープンソースソフトウェア(OSS)の世界は大きく変わってきました。それはGitHubの台頭とソーシャルコーディングの普及によるものが大きいと考えています。
ご存知の通り、ソフトウェアというのは、日々変わる状況、例えば生産性の高い言語の登場や新しいAPIや仕様、便利なフレームワークの登場、セキュリティホールの発見や新しいアーキテクチャへの対応をし、進化をし続けねばすぐに陳腐化して使えなくなってしまいます。
そこに登場にしたのがこのソーシャルコーディングという概念です。人はソースコードを利用して問題に直面すると、その状況に対応するコードを書き直し対処します。このGitHubでは、Gitという分散リポジトリの概念と内包するSNSの機能によって、その新しく書かれたコードの構成管理と情報の共有、伝播を一気におこなってくれます。
これはすごいことです!誰かが苦労して新しい状況に対応したソフトウェアのコードをソーシャルというフィルターを介して選別、共有し、集約されることで加速的に人類全体のITに関する生産性を高めていけるのです。一つのパラダイムシフトが起こったのではないかと思います。
今までソフトウエア開発と言えば、Googleで調べたり、その結果をブログにまとめたりしながすすめていくという感じでした。その営みがGitHubという構成管理が可能なリポジトリ内包の、有機的なシステムの中で全て繋がっているのです。これはどういうことかといえば、最近のGitHubと有機的な結びつきの強いシステムの例えで言えば、
- Homebrew (MacOSXのUNIXツールのパッケージマネージャ)
- giter8 (Scalaのフレームワークのテンプレートマネージャ)
- npm (node.jsのパッケージマネージャ)
- vundle (Vimのプラグインの管理プラグイン)
- gem (rubyのパッケージマネージャ)
などを使えば、自動的にその情報集約の結果を利用できるのです。具体的には、brew install scalaとコンソールで実行することで、今の最新の状況のインストール方法(formula)が自動的に参照されてインストールされ、さらにその依存関係として必要な最新のものも全てインストールされます。これには最新の状況に対応するための世界中の人の苦労と叡智が詰め込まれています。
また、問題があった際には、GitHubのIssueやwikiですぐに管理され、元のリポジトリが修正されることもあれば、有志がそのリポジトリをフォーク(コピーして別のリポジトリを作る)して、その修正した結果を公開してそれを使うこともできるのです。そして、システムの参照も良いリポジトリが参照されて全体として、有機的に最適化されていきます。これはすごい!
あと、これらのGitHubの結びつきの強いシステムの素晴らしいことは基本的にCUI(キャラクターユーザーインターフェース)なことです。これは実は素晴らしい利点があります。それはメンテナンスコストがGUI(グラフィカルユーザーインターフェース)のソフトウェアに比べて圧倒的に低いのです。
このことでソフトウェアは、進化を素早く進めていくことができます。状況が固定化したソフトウェアに関しては、GUIのアプリケーションというのはユーザーに優しく非常に便利ですが、変わる状況に対して素早く対応していくためには、CUIの方が圧倒的に有利なのです。
EclipseなどのIDEが開発環境として便利で人気がある一方、先端技術を追いつつけるソフトウェアエンジニアの中では、VimやEmacsが開発環境として人気があるのは、新しいフレームワークや言語の開発サポートというのは、まずはVimやEmacsでしかされないというところにあると思います。つまり、CUIを使うことで先進的な技術に常に触れることができるのです。また、今はこのソーシャルコーディングの恩恵を強く受けることができる。GitHubとの連携ツールはCUIものが、更新が速く便利なものが多いと感じています。というか、GUIのものはそんなに多くないです。
GitHubは、このCUIのソフトウェアの生態系と合わせて、生産性の向上の速度を更に高めてくれる加速剤のようなものです。今までのエンジニアがGoogleとブログを使ってポチポチ進めていっていた結果を意識することなく全て利用することができます。
これから、このソーシャルコーディングというGitHubの生態系をシステムの中に取り込んでいないOSSはどんどん取り残されていくのではないかと思います。
オープンソースを利用するエンジニアもどんどんGitHubを利用し、さらに自分たちのコーディングの結果をGitHubに公開することでよりよいITの世界を創造していくことにつながるのではないかと思います。
また、このGitHubの副産物ですが、最近は就職活動でもこのGitHubが使われるそうです。GitHubのアカウントを登録するだけでエントリー完了だそうです。また転職エージェントもこのGitHubのアカウントを見て、そのエンジニアを評価するのに使えたりもします。
ワンクリック採用|面白法人カヤック、こんなものも話題になりました。
確かに転職エージェントが技術もわからず、メールを送りまくるのに使われるのにはちょっと問題はありますが、少なくとも今までよりソフトウェアエンジニアのリクルートはずっとやりやすくなるのではないでしょうか。またGitHubを使いこなせるようになるためには、ソフトウェアエンジニアとしての基礎知識も必要となるので、かなり良いふるいになるとは思います。
ぜひ、これからもしっかりGitHubを使ってソーシャルコーディングしていければと思います。
追伸
ちなみにソフトウェアは、日々進化し、それに追随しなくては陳腐化するという話を書きましたが、残念ながら日本の多くの会社がその社内のシステムを新しいトレンドに追随できず、未だにIE6を使っています。これがどれだけ新しいIT技術の恩恵を受けられない損失かというのは、わかっていない人が非常に多い。IE6開発はChrome開発の何倍工数(コスト)がかかるのか知っているでしょうか...。
確かに、これにはITバブル期に高い値段で構築したシステムなので非常に保守、改修にコストがかかるというSIerの商売上の問題も含まれているので悩ましいところですが、どこかでこのレガシーコストを払わなければ、ITの良さをどんどん取り込めなくなってしまいます。
今、ソフトウェアは進化し続けなくてはいけないという特性が実感されやすい状況が来た所で、今後は、より可搬性や柔軟性の高いフレームワークを使ってシステムを構築していくというのがトレンドになっていくのではないかと個人的には思っています。
Scala2.9.1でEclipse3.6.2を使ってMavenビルドする方法
最近Scala勉強中ですが、maven-scala-pluginを使ってScalaのコードをビルドしようとしたところ、Scalaのバージョンが2.8.0だったり、そもそもデフォルトのpom.xmlじゃ動かなかったので、そのために修正した方法を以下にまとめておきました。
(ただ、Scalaのビルドはsbtの方が断然楽なので、giter8で作ったテンプレートをsbtでビルドして、SbtEclipsifyでEclipseに読み込む方法も断然ありだと思います。)
前提として、Eclipse3.6.2(helios)にScala IDE for Eclipse 2.0.0とe2eclipseが既にインストール済みの状態で進めていきます。Eclipse3.6.2のダウンロード及び、Scala IDE for Eclipse2.0.0とe2eclipseのアップデートサイトの登録からのインストール方法については、以下のサイトの参照のこと。
Eclipse.org - Helios Simultaneous Release!
Scala IDE for Eclipse 2.0.0
m2eclipse: Maven in Eclipse
というわけで、早速Eclipseを適当なワークスペース名で起動して、パッケージエクスプローラで右クリックして、New > Otherを選択します。
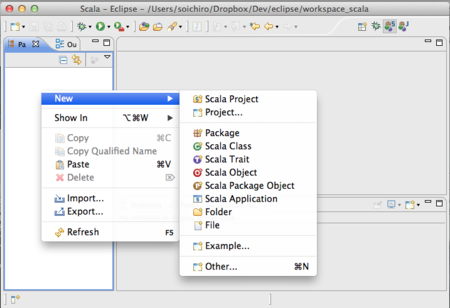
ここで、Maven > Maven Projectを選択してNext > をクリック。

ワークスペースの場所やワーキングセットは特に設定せずにNext > をクリック。

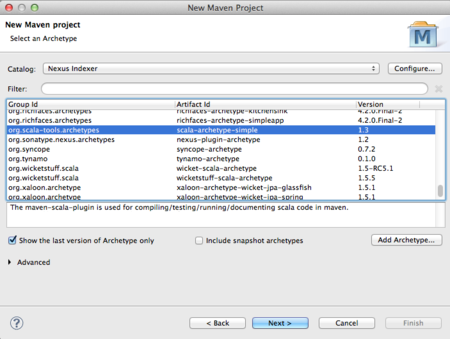
ちょっとロードに時間がかかりますが、少し待つとNexus Indexerのカタログ内のArchetypeの選択にて以下が出現するので選択します。
を選択。なぜか、一度アップデートを一度走らせるまではバージョンが1.1だったりしますが、あとで書き換えてしまうので、特に問題はありません。
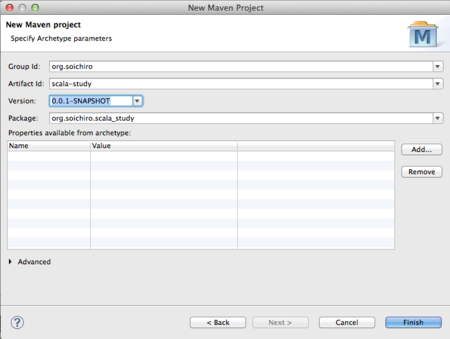
Group IdやArtifact Idを設定する。自分は、Group Idはorg.soichiro、Artifact Idは、scala-studyにしました。Versionは、0.0.1-SNAPSHOTのままで、パッケージ名は自動的に入力されるのでそのままで。これでFinish。
というわけで一つ一つ解決していきます。まず、pom.xml自体があれScala2.8.0向けなので以下に書き換えます。既に、後で通常のmaven環境で実行するためのlancherの設定も書き加えてありますが、とりあえずひな形として以下を使います。Group IdやArtifact Id、lancherのmainClassは随意書き換えてください。なおmainClassのパッケージ名は-が_に置換されているので要注意。
なお、参考にさせてもらったのは以下のサイト。残念ながら本家の情報更新が古い。。。
gist: 1196756
maven-scala-plugin
追記
Mavenリポジトリの登録サイトではなく、Githubの方にmavenプラグインの最新ドキュメントがあるようです。id:xuweiさん、情報ありがとうございます。
Github内のscala-maven-plugin
<project xmlns="http://maven.apache.org/POM/4.0.0" xmlns:xsi="http://www.w3.org/2001/XMLSchema-instance"
	xsi:schemaLocation="http://maven.apache.org/POM/4.0.0 http://maven.apache.org/maven-v4_0_0.xsd">
	<modelVersion>4.0.0</modelVersion>
	<groupId>org.soichiro</groupId>
	<artifactId>scala-study</artifactId>
	<version>0.0.1-SNAPSHOT</version>
	<name>${project.artifactId}</name>
	<description>My wonderfull scala app</description>
	<inceptionYear>2010</inceptionYear>
	<licenses>
		<license>
			<name>My License</name>
			<url>http://....</url>
			<distribution>repo</distribution>
		</license>
	</licenses>

	<properties>
		<maven.compiler.source>1.5</maven.compiler.source>
		<maven.compiler.target>1.5</maven.compiler.target>
		<encoding>UTF-8</encoding>
		<scala.version>2.9.1</scala.version>
	</properties>

	<repositories>
		<repository>
			<id>scala-tools.org</id>
			<name>Scala-Tools Maven2 Repository</name>
			<url>http://scala-tools.org/repo-releases</url>
		</repository>
	</repositories>

	<pluginRepositories>
		<pluginRepository>
			<id>scala-tools.org</id>
			<name>Scala-Tools Maven2 Repository</name>
			<url>http://scala-tools.org/repo-releases</url>
		</pluginRepository>
	</pluginRepositories>

	<dependencies>
		<dependency>
			<groupId>org.scala-lang</groupId>
			<artifactId>scala-library</artifactId>
			<version>${scala.version}</version>
		</dependency>

		<!-- Test -->
		<dependency>
			<groupId>junit</groupId>
			<artifactId>junit</artifactId>
			<version>4.8.1</version>
			<scope>test</scope>
		</dependency>
		<dependency>
			<groupId>org.scala-tools.testing</groupId>
			<artifactId>specs_${scala.version}</artifactId>
			<version>1.6.9</version>
			<scope>test</scope>
		</dependency>
		<dependency>
			<groupId>org.scalatest</groupId>
			<artifactId>scalatest_${scala.version}</artifactId>
			<version>1.6.1</version>
			<scope>test</scope>
		</dependency>
	</dependencies>

	<build>
		<sourceDirectory>src/main/scala</sourceDirectory>
		<testSourceDirectory>src/test/scala</testSourceDirectory>
		<plugins>
			<plugin>
				<groupId>org.scala-tools</groupId>
				<artifactId>maven-scala-plugin</artifactId>
				<version>2.15.0</version>
				<configuration>
					<launchers>
						<launcher>
							<id>default</id>
							<mainClass>org.soichiro.scala_study.App</mainClass>
							<!-- args are optional -->
							<args>
								<arg>arg1</arg>
								<arg>arg2</arg>
								<arg>arg3</arg>
							</args>
							<!-- jvmArgs are optional -->
							<jvmArgs>
								<jvmArg>-Xmx128m</jvmArg>
								<!-- jvmArg>-Djava.library.path=...</jvmArg -->
							</jvmArgs>
						</launcher>
						<!-- you could define other launcher -->
					</launchers>
				</configuration>
				<executions>
					<execution>
						<goals>
							<goal>compile</goal>
							<goal>testCompile</goal>
						</goals>
						<configuration>
							<args>
								<arg>-make:transitive</arg>
								<arg>-dependencyfile</arg>
								<arg>${project.build.directory}/.scala_dependencies</arg>
							</args>
						</configuration>
					</execution>
				</executions>
			</plugin>
			<plugin>
				<groupId>org.apache.maven.plugins</groupId>
				<artifactId>maven-surefire-plugin</artifactId>
				<version>2.6</version>
				<configuration>
					<useFile>false</useFile>
					<disableXmlReport>true</disableXmlReport>
					<!-- If you have classpath issue like NoDefClassError,... -->
					<!-- useManifestOnlyJar>false</useManifestOnlyJar -->
					<includes>
						<include>**/*Test.*</include>
						<include>**/*Suite.*</include>
					</includes>
				</configuration>
			</plugin>
		</plugins>
		<pluginManagement>
			<plugins>
				<!--This plugin's configuration is used to store Eclipse m2e settings
					only. It has no influence on the Maven build itself. -->
				<plugin>
					<groupId>org.eclipse.m2e</groupId>
					<artifactId>lifecycle-mapping</artifactId>
					<version>1.0.0</version>
					<configuration>
						<lifecycleMappingMetadata>
							<pluginExecutions>
								<pluginExecution>
									<pluginExecutionFilter>
										<groupId>org.scala-tools</groupId>
										<artifactId>
											maven-scala-plugin
    								</artifactId>
										<versionRange>
											[2.15.0,)
    								</versionRange>
										<goals>
											<goal>compile</goal>
											<goal>testCompile</goal>
										</goals>
									</pluginExecutionFilter>
									<action>
										<ignore></ignore>
									</action>
								</pluginExecution>
							</pluginExecutions>
						</lifecycleMappingMetadata>
					</configuration>
				</plugin>
			</plugins>
		</pluginManagement>
	</build>
</project>
無事、編集が済んだら保存してコンパイルを待ちます。
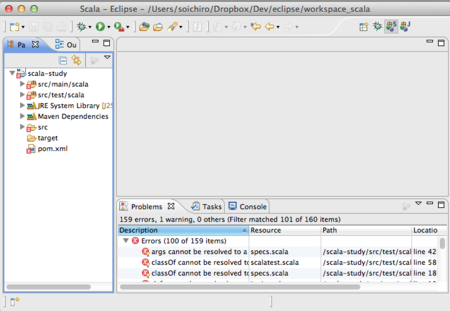
だが、それでも赤い。
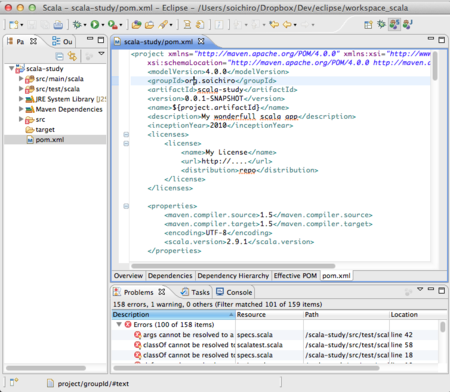
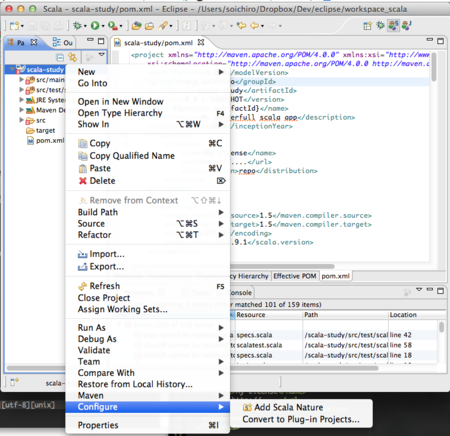
どうやらScalaのパスが正しく認識されていないようなので、ScalaのNatureを足します。パッケージエクスプローラの右クリックから、Configure > Add Scala Natureを選択。
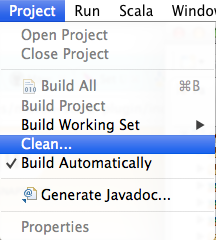
これで再度ビルドが走ります。念のため、一度、クリーニング。メニューバーからProject > Cleanを選択。それで再度待ちます。だが、それでも赤い。
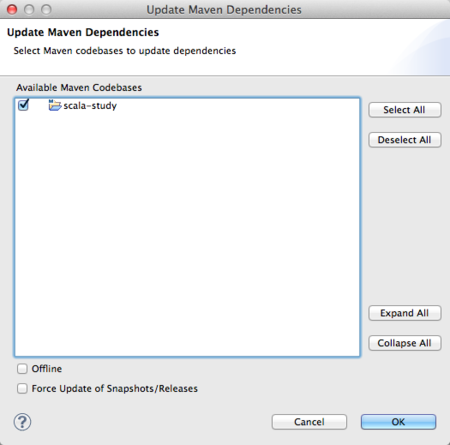
Mavenの設定をアップデートしろということなので、従います。

パッケージエクスプローラで、プロジェクトのルートノードを選択して、Maven > Update Project Configuration...を選択。
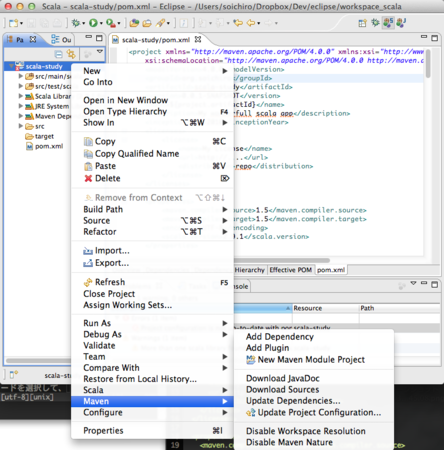
特に何も考えずにOKをクリックすると。無事エラーの消えたScala2.9.1のMavenプロジェクトが完成します。
org.soichiro.scala_study.Appというオブジェクトが、HelloWorld!を記述しているので、実際に右クリックRun As > Scala Applicationを実行して実行確認してみましょう。Debug Asだとブレークポイントも使えます。

というわけで、早速、ビルド、テスト、インストールしてみます。プロジェクトのルートノードを選択して、Run As > Maven Installを実行。
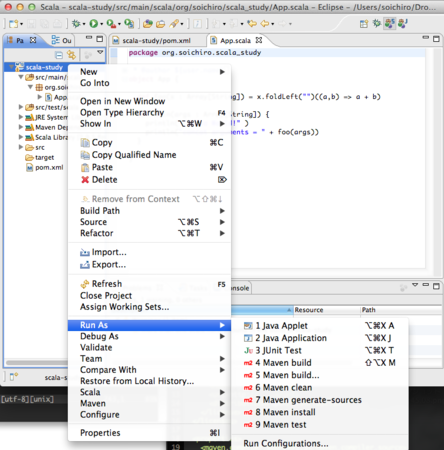
コンソールに以下が出力されます。
[INFO] Scanning for projects...
[INFO]
[INFO] ------------------------------------------------------------------------
[INFO] Building scala-study 0.0.1-SNAPSHOT
[INFO] ------------------------------------------------------------------------
[INFO]
[INFO] --- maven-resources-plugin:2.4.3:resources (default-resources) @ scala-study ---
[INFO] Using 'UTF-8' encoding to copy filtered resources.
[INFO] skip non existing resourceDirectory /Users/soichiro/Dropbox/Dev/eclipse/workspace_scala/scala-study/src/main/resources
[INFO]
[INFO] --- maven-compiler-plugin:2.3.2:compile (default-compile) @ scala-study ---
[INFO] Nothing to compile - all classes are up to date
[INFO]
[INFO] --- maven-scala-plugin:2.15.0:compile (default) @ scala-study ---
[INFO] Checking for multiple versions of scala
[INFO] includes = [**/*.scala,**/*.java,]
[INFO] excludes = []
[INFO] /Users/soichiro/Dropbox/Dev/eclipse/workspace_scala/scala-study/src/main/scala:-1: info: compiling
[INFO] Compiling 1 source files to /Users/soichiro/Dropbox/Dev/eclipse/workspace_scala/scala-study/target/classes at 1333073535276
[INFO] No known dependencies. Compiling everything
[WARNING] warning: there were 1 deprecation warnings; re-run with -deprecation for details
[WARNING] one warning found
[INFO] prepare-compile in 0 s
[INFO] compile in 5 s
[INFO]
[INFO] --- maven-resources-plugin:2.4.3:testResources (default-testResources) @ scala-study ---
[INFO] Using 'UTF-8' encoding to copy filtered resources.
[INFO] skip non existing resourceDirectory /Users/soichiro/Dropbox/Dev/eclipse/workspace_scala/scala-study/src/test/resources
[INFO]
[INFO] --- maven-compiler-plugin:2.3.2:testCompile (default-testCompile) @ scala-study ---
[INFO] Nothing to compile - all classes are up to date
[INFO]
[INFO] --- maven-scala-plugin:2.15.0:testCompile (default) @ scala-study ---
[INFO] Checking for multiple versions of scala
[INFO] includes = [**/*.scala,**/*.java,]
[INFO] excludes = []
[INFO] /Users/soichiro/Dropbox/Dev/eclipse/workspace_scala/scala-study/src/test/scala:-1: info: compiling
[INFO] Compiling 3 source files to /Users/soichiro/Dropbox/Dev/eclipse/workspace_scala/scala-study/target/test-classes at 1333073541161
[INFO] No known dependencies. Compiling everything
[WARNING] warning: there were 1 deprecation warnings; re-run with -deprecation for details
[WARNING] one warning found
[INFO] prepare-compile in 0 s
[INFO] compile in 11 s
[INFO]
[INFO] --- maven-surefire-plugin:2.6:test (default-test) @ scala-study ---
[INFO] Surefire report directory: /Users/soichiro/Dropbox/Dev/eclipse/workspace_scala/scala-study/target/surefire-reports

-------------------------------------------------------
 T E S T S
-------------------------------------------------------
Running samples.ListSuite
Tests run: 3, Failures: 0, Errors: 0, Skipped: 0, Time elapsed: 0.598 sec
Running samples.StackSuite
Tests run: 2, Failures: 0, Errors: 0, Skipped: 0, Time elapsed: 0.032 sec
Running samples.AppTest
Tests run: 1, Failures: 0, Errors: 0, Skipped: 0, Time elapsed: 0.001 sec
Running samples.MySpecTest
Tests run: 3, Failures: 0, Errors: 0, Skipped: 2, Time elapsed: 0.233 sec

Results :

Tests run: 9, Failures: 0, Errors: 0, Skipped: 2

[INFO]
[INFO] --- maven-jar-plugin:2.3.1:jar (default-jar) @ scala-study ---
[INFO] Building jar: /Users/soichiro/Dropbox/Dev/eclipse/workspace_scala/scala-study/target/scala-study-0.0.1-SNAPSHOT.jar
[INFO]
[INFO] --- maven-install-plugin:2.3.1:install (default-install) @ scala-study ---
[INFO] Installing /Users/soichiro/Dropbox/Dev/eclipse/workspace_scala/scala-study/target/scala-study-0.0.1-SNAPSHOT.jar to /Users/soichiro/.m2/repository/org/soichiro/scala-study/0.0.1-SNAPSHOT/scala-study-0.0.1-SNAPSHOT.jar
[INFO] Installing /Users/soichiro/Dropbox/Dev/eclipse/workspace_scala/scala-study/pom.xml to /Users/soichiro/.m2/repository/org/soichiro/scala-study/0.0.1-SNAPSHOT/scala-study-0.0.1-SNAPSHOT.pom
[INFO] ------------------------------------------------------------------------
[INFO] BUILD SUCCESS
[INFO] ------------------------------------------------------------------------
[INFO] Total time: 25.060s
[INFO] Finished at: Fri Mar 30 11:12:38 JST 2012
[INFO] Final Memory: 9M/81M
[INFO] ------------------------------------------------------------------------
無事、ビルド、テストが成功。ちゃんとJUnitとScalatest、specsのそれぞれのテストも問題なく流れています。そして成果物が、targetフォルダの中に生成されています。
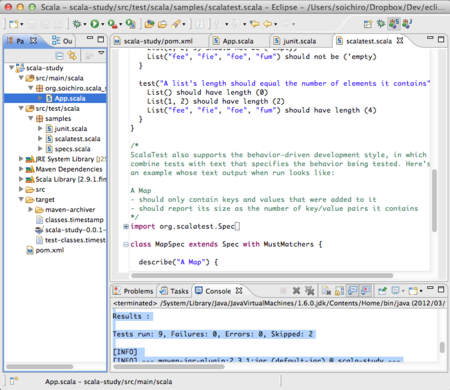
これで無事完了ですが、実際に成果物をコンソール上で実行してみます。実行にはMavenが必要となるので以下のサイトを参考にインストールの事。ちょっと下の方にインストール方法が書いてあります。ちなみにバージョンは2.2.1を使って試しました。
では、実際にmaven-scala-pluginで書かれていた実行方法を試してみます。(MacOSXで実行していますが、Winでも同様に行えるはずです。)
$ cd /Users/soichiro/Dropbox/Dev/eclipse/workspace_scala/scala-study
$ mvn scala:run
[INFO] Scanning for projects...
[INFO] ------------------------------------------------------------------------
[INFO] Building scala-study
[INFO]    task-segment: [scala:run]
[INFO] ------------------------------------------------------------------------
[INFO] Preparing scala:run
[INFO] [resources:resources {execution: default-resources}]
[INFO] Using 'UTF-8' encoding to copy filtered resources.
[INFO] skip non existing resourceDirectory /Users/soichiro/Dropbox/Dev/eclipse/workspace_scala/scala-study/src/main/resources
[INFO] [compiler:compile {execution: default-compile}]
[INFO] Nothing to compile - all classes are up to date
[INFO] [scala:compile {execution: default}]
[INFO] Checking for multiple versions of scala
[INFO] includes = [**/*.scala,**/*.java,]
[INFO] excludes = []
[INFO] Nothing to compile - all classes are up to date
[INFO] [resources:testResources {execution: default-testResources}]
[INFO] Using 'UTF-8' encoding to copy filtered resources.
[INFO] skip non existing resourceDirectory /Users/soichiro/Dropbox/Dev/eclipse/workspace_scala/scala-study/src/test/resources
[INFO] [compiler:testCompile {execution: default-testCompile}]
[INFO] Nothing to compile - all classes are up to date
[INFO] [scala:testCompile {execution: default}]
[INFO] Checking for multiple versions of scala
[INFO] includes = [**/*.scala,**/*.java,]
[INFO] excludes = []
[INFO] Nothing to compile - all classes are up to date
[INFO] [scala:run {execution: default-cli}]
[INFO] Checking for multiple versions of scala
[INFO] launcher 'default' selected => org.soichiro.scala_study.App
Hello World!
concat arguments = arg1arg2arg3
[INFO] ------------------------------------------------------------------------
[INFO] BUILD SUCCESSFUL
[INFO] ------------------------------------------------------------------------
[INFO] Total time: 3 seconds
[INFO] Finished at: Fri Mar 30 11:14:52 JST 2012
[INFO] Final Memory: 17M/81M
[INFO] ------------------------------------------------------------------------
というわけで、無事、素のmaven環境でもHello World!の実行を確認できました。
これで、Scala2.9.1とEclipseとMavenを使ったビルド方法は完了です。
お疲れ様でした。
なお、プラグインなどを作る際には、
Creating/Using a Scalac plugin
が参考になりそうです。Mavenを使ったビルドはpom.xmlのデバッグが本当に大変なので頑張ってください。(個人的にはJava複雑なことをするならAnt&Ivyがいいかなぁなんて思っています。Scalaにはsbtあるので、正直何が生き残っていくのかまだわかりません。)

